
 It recently was my birthday. (I turned 29 yet again, if you must ask.) Harry’s birthday is just a few days after mine, so I usually make him the standard birthday cake (this year it was a classic yellow cake with chocolate buttercream frosting), and I make some other kind of dessert for my birthday. Since it’s usually just the two of us indulging in these birthday treats, I try to make the earlier one either something we can eat all of very quickly (fat chance*), or something freezable that we can enjoy over the next few weeks.
This year, I considered an ice cream cake for my birthday. It’s festive yet freezable, and definitely decadent enough for a celebration. I was perusing my copy of Ben & Jerry’s Homemade Ice Cream & Dessert Book and saw that these geniuses used brownies instead of cake in their ice cream cake recipe. I’d made a layered ice cream cake with actual cake before, and while it was fine, I thought a brownie layer would be brilliant. It all came together like sweet serendipity when I read the notes accompanying a brownie recipe in The Ultimate Brownie Book by Bruce Weinstein and Mark Scarbrough: “They’re also good right out of the freezer: cold, chewy, and very chocolaty.” This layered ice cream treat was frozen, rich, chocolate destiny.
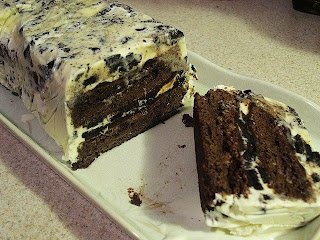
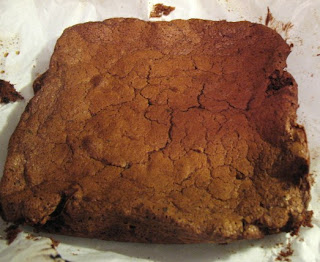
I baked the brownies (an 8” square batch), made hot fudge sauce and vanilla ice cream and layered them along with crumbled Oreo cookies. I used an 8-inch bread pan lined with plastic wrap as a mold. The brownies were a little crumbly and broke into fourths after I cut them in half, but that seemed to make no difference in the final product. The fudge sauce was too thick (mmmmm…thick, rich fudge sauce) to spread or dollop over the softened ice cream, so I spread it on the brownies. The fudge sauce I used (homemade and based on the recipe in the Ben and Jerry’s book…see below for my version) sets up like a soft ganache when cooled, so it makes a soft and chewy and intensely chocolaty layer in the dessert. Since the ice cream needs to be pretty soft and melty to spread, it also kind of squished out the sides of the layers and ended up coating the outside like frosting on a cake. I can’t say this was intended, and this may not happen if your ice cream isn’t as soft as mine was, but I will say that I liked it.
 While I went all out and made most of the main ingredients from scratch for this treat, you could use store-bought ice cream, fudge sauce and brownies, or make brownies from your favorite boxed mix. I’ve included the recipes I used for the brownies and the fudge sauce below. They’re both very good on their own or in other applications as well. I can imagine many other ingredients and flavors that could be enjoyed using this method, such as mint chocolate chip ice cream instead of vanilla, pecans and caramel instead of chocolate sandwich cookies, or blondies in place of the brownie layer with butter pecan ice cream and butterscotch sauce. I think I may just have to start having more birthdays!
*Any and all perceived puns on this site are fully intended unless otherwise noted by the author
Hot Fudge Sauce
Adapted from Ben &Jerry’s Homemade Ice Cream & Dessert Book by Ben Cohen and Jerry Greenfield with Nancy J. Stevens
2 ounces unsweetened chocolate
¼ cup (½ stick) unsalted butter
¼ cup plus 2 tablespoons unsweetened cocoa powder
1 cup sugar
½ cup heavy cream
1. In a medium saucepan, melt the chocolate and butter over low heat, stirring frequently. Be very careful not to burn the chocolate.

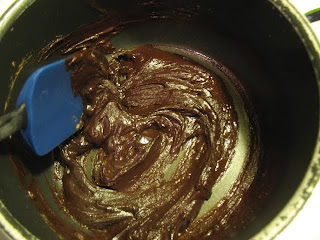
2. When the chocolate and butter are completely melted and smooth, add the cocoa powder. Whisk until the cocoa is completely incorporated and no dry cocoa is visible.
3. Stir in the sugar a little at a time. When the sugar is fully incorporated, the mixture will have the consistency of wet sand.

4. Slowly stir in the cream. Cook over low heat stirring frequently until the sugar has all dissolved and the sauce is smooth and glossy, about 20-30 minutes.

Makes about 1 ½ cups.
Serve warm over ice cream, etc. or chill until ready to use. Warm and stir before using if chilled.
BrowniesAdapted from a recipe in The Ultimate Brownie Book by Bruce Weinstein and Mark Scarbrough
The instant coffee powder I added to these brownies just darkens the flavor a bit more and gives them some mocha character. It is optional.
½ cup all-purpose flour
¼ cup plus two tablespoons unsweetened cocoa powder
¼ teaspoon baking powder
¼ teaspoon salt
2 teaspoons instant coffee powder (optional)
½ cup (¼ pound or 1 stick) unsalted butter at room temperature
1 cup sugar
2 large eggs
1 teaspoon vanilla extract
1. Preheat oven to 350 F. Fit a piece of parchment paper to cover the bottom and sides of an 8-inch square baking pan. Spray the parchment with cooking spray. (This will enable you to remove the entire pan of brownies in one piece after they have baked and cooled. If you just want to eat these brownies and don’t mind cutting them out of the pan one at a time, you could just grease the pan well.)
2. In a medium-size bowl, combine the flour, cocoa powder, baking powder and salt. Whisk together until well-combined and there are now lumps. (Alternatively, you could sift this mixture together.) Set aside.
3. In the bowl of a heavy-duty mixture, combine the butter and sugar. Beat at medium speed until very fluffy and pale in color. (You could also use a large bowl and a hand-held mixer to do this.)
4. Add the eggs one at a time and beat well to incorporate fully after each addition. Beat for about one minute more after the second egg has been added and then beat in the vanilla extract.
5. Slowly stir in the flour mixture until just a few bits of dry ingredients are visible. With a spoon or rubber spatula, gently stir the batter until all the dry ingredients are just moistened.
6. Spoon the batter into the prepared baking pan and smooth the top. Bake at 350 F for 25 to 27 minutes or until a wooden pick inserted in the middle comes out without any wet batter clinging to it. Cool completely on a wire rack. Remove the whole thing from the pan by pulling up by the parchment paper. Cut as desired.
Makes 8-10 servings or enough brownie for 1 8-inch by 4-inch layered ice cream brownie dessert.
Layered Brownie Ice Cream Dessert
1 heaping cup chopped chocolate sandwich cookies (such as Oreos), divided
2 cups vanilla ice cream, softened, divided
1 8-inch square recipe Brownies (such as the recipe above), cut in half
¾ cup cooled Hot Fudge Sauce (such as the recipe above), divided
1. Line an 8-inch by 4-inch bread pan (or other container of similar size) with plastic wrap with enough hanging over the edges to wrap completely over the top.
2. Place half of the chopped cookies into the bottom of the lined pan in an even layer. Spread half of the ice cream over the top of the cookies.
 3. Spread ¼ cup of the fudge sauce on one side of one half of the brownie. Place it fudge side down on top of the ice cream. Spread ¼ cup fudge sauce on the other side of the brownie. Layer the remaining half of the cookies over the brownie.


Adapted from Ben &Jerry’s Homemade Ice Cream & Dessert Book by Ben Cohen and Jerry Greenfield with Nancy J. Stevens
2 ounces unsweetened chocolate
¼ cup (½ stick) unsalted butter
¼ cup plus 2 tablespoons unsweetened cocoa powder
1 cup sugar
½ cup heavy cream
1. In a medium saucepan, melt the chocolate and butter over low heat, stirring frequently. Be very careful not to burn the chocolate.


2. When the chocolate and butter are completely melted and smooth, add the cocoa powder. Whisk until the cocoa is completely incorporated and no dry cocoa is visible.
3. Stir in the sugar a little at a time. When the sugar is fully incorporated, the mixture will have the consistency of wet sand.

4. Slowly stir in the cream. Cook over low heat stirring frequently until the sugar has all dissolved and the sauce is smooth and glossy, about 20-30 minutes.
Makes about 1 ½ cups.
Serve warm over ice cream, etc. or chill until ready to use. Warm and stir before using if chilled.
BrowniesAdapted from a recipe in The Ultimate Brownie Book by Bruce Weinstein and Mark Scarbrough
The instant coffee powder I added to these brownies just darkens the flavor a bit more and gives them some mocha character. It is optional.
½ cup all-purpose flour
¼ cup plus two tablespoons unsweetened cocoa powder
¼ teaspoon baking powder
¼ teaspoon salt
2 teaspoons instant coffee powder (optional)
½ cup (¼ pound or 1 stick) unsalted butter at room temperature
1 cup sugar
2 large eggs
1 teaspoon vanilla extract
1. Preheat oven to 350 F. Fit a piece of parchment paper to cover the bottom and sides of an 8-inch square baking pan. Spray the parchment with cooking spray. (This will enable you to remove the entire pan of brownies in one piece after they have baked and cooled. If you just want to eat these brownies and don’t mind cutting them out of the pan one at a time, you could just grease the pan well.)
2. In a medium-size bowl, combine the flour, cocoa powder, baking powder and salt. Whisk together until well-combined and there are now lumps. (Alternatively, you could sift this mixture together.) Set aside.
3. In the bowl of a heavy-duty mixture, combine the butter and sugar. Beat at medium speed until very fluffy and pale in color. (You could also use a large bowl and a hand-held mixer to do this.)
4. Add the eggs one at a time and beat well to incorporate fully after each addition. Beat for about one minute more after the second egg has been added and then beat in the vanilla extract.
5. Slowly stir in the flour mixture until just a few bits of dry ingredients are visible. With a spoon or rubber spatula, gently stir the batter until all the dry ingredients are just moistened.
6. Spoon the batter into the prepared baking pan and smooth the top. Bake at 350 F for 25 to 27 minutes or until a wooden pick inserted in the middle comes out without any wet batter clinging to it. Cool completely on a wire rack. Remove the whole thing from the pan by pulling up by the parchment paper. Cut as desired.

Makes 8-10 servings or enough brownie for 1 8-inch by 4-inch layered ice cream brownie dessert.
Layered Brownie Ice Cream Dessert
1 heaping cup chopped chocolate sandwich cookies (such as Oreos), divided
2 cups vanilla ice cream, softened, divided
1 8-inch square recipe Brownies (such as the recipe above), cut in half
¾ cup cooled Hot Fudge Sauce (such as the recipe above), divided
1. Line an 8-inch by 4-inch bread pan (or other container of similar size) with plastic wrap with enough hanging over the edges to wrap completely over the top.
2. Place half of the chopped cookies into the bottom of the lined pan in an even layer. Spread half of the ice cream over the top of the cookies.
 3. Spread ¼ cup of the fudge sauce on one side of one half of the brownie. Place it fudge side down on top of the ice cream. Spread ¼ cup fudge sauce on the other side of the brownie. Layer the remaining half of the cookies over the brownie.

4. Spread the remaining ice cream over the cookies. Spread the remaining fudge sauce on one side of the remaining brownie half. Place the brownie, fudge side down on the ice cream. Wrap the over-hanging ends of the plastic wrap over the top of the last brownie layer.
5. Freeze the layered dessert for several hours. To remove from the pan, you may need to soak the bottom of the pan for a few moments in warm water. Unwrap the plastic wrap and invert the pan over a plate and release the cake. Remove the remaining plastic wrap. Slice with a serrated knife warmed with warm water to serve.
Makes about 10 servings. Re-wrap leftovers and keep frozen, preferably in a zip-top freezer bag or other freezer-safe container.
Another recipe like this one: Rich Chocolate Ice Cream
One year ago: Zucchini and Mint Frittata with Tomatoes on Top
Wow. If this is what you make for your birthday, we'll be visiting you in August next time. It looks delicious!
ReplyDelete